Property Investment
Which property investment strategy should I use?
Thinking about investing in property? You're probably wondering if you should buy and hold or buy and flip. This article will help you make the right decision.
BRRRR
9 min read


Author: Ed McKnight
Resident Economist, with a GradDipEcon and over five years at Opes Partners, is a trusted contributor to NZ Property Investor, Informed Investor, Stuff, Business Desk, and OneRoof.
Reviewed by: Laine Moger
Journalist and Property Educator, holds a Bachelor of Communication (Honours) from Massey University.
Multi-income properties, either a room-by-room rental or a home-and-income, tend to earn more rent and better cashflow for property investors.
But if it were as simple as: “Put more tenants into the property”, everyone would do it.
Figuring out if your property could work as a room-by-room or a multi-income comes in at step #2 of the Cashflow Hacking List – a 6-step approach to turbocharge any BRRRR project.
A room-by-room rental will, by and large, be the most lucrative renovation. But, it is also the most costly and complex.
However, renovating a property into a multi-income is a more straightforward and cheaper option. It’s also very common.
In this article, you’ll learn 6 of my top considerations for multi-income conversions. This will show you how to turn your single-income rental into a multi-income property.
NOTE: This article focuses on multi-income conversions, which are less expensive and complex than a room-by-room alternative. Read more about this type of conversion in part 1 article.
And if you have a question, write your questions or thoughts in the comments section below.
The critical difference between a standard rental property and a multi-tenancy is the number of tenancy agreements.
A standard rental property, e.g. a 3 bedroom house, typically has 1 tenancy agreement with one household living in the property.
However, you have two or more households living on the site with a multi-income property. And each has its own separate tenancy agreements.
You need to create multiple legally separate dwellings on the same site to do this. So, both sets of tenants live in different spaces within one property. But, they don’t “live together”.
On the other hand, a room-by-room rental is a property where each bedroom is rented to an individual tenant. Each has a separate tenancy agreement, but they live in the same dwelling.
So, while each tenant has their own room, they share kitchens, laundries and other living spaces.
The most common types of multi-income conversions are splicing a one-storey dwelling into two or a “top-down” transformation.
This means you turn the downstairs garage, basement or living space into a second home. The latter is common because it involves repurposing the space that already exists within the property’s floor plan. No need to build an extension.
So, if you are set to convert your property into a multi-income here are the 6 things you need to consider:
First thing, check out the dwelling size and configuration of your intended BRRRR project. Without sounding obvious – you need a lot of space to turn 1 dwelling into 2.
As a rule of thumb, a floorplan needs at least 130 square metres to withstand a top-down (upstairs–downstairs) multi-income conversion.
This is slightly smaller than the minimum required for a room-by-room – which needs at least 170+ square meters.
However, if you are turning a single-story house into two separate dwellings, you’ll need 190 to 200 square metres, as a bare minimum.
While a top-down conversion is easier to spot, single story conversions can make sense too. But, you need to find a “natural” way to split that house into two.
This is because a successful BRRRR strategy can’t feel “forced”. You can’t create a pokey or unusual floor plan, as this will make the property hard to rent.
You also need to think through the vertical space as well. If you are doing a top-down conversion, the ceiling height of the downstairs area needs to be at least 2.2 meters tall for it to even be considered for a conversion.
So, if you walk in the room and your builder’s hair is grazing the ceiling – it’s not going to work.
To give you a sense of what to look for, the ideal top-down conversion is usually a 70s-something house, typically 3 bed/1 bath, with an existing floorplan of over 130 square metres.
It would have an oddly large open-plan living area with dining and kitchen, and a downstairs garage. (More on why this is important below).
In my experience, the ideal type of property would have been a grand property in its day.
It isn’t possible to get this exact situation in every instance, but this gives you a rough idea of the parameters you want to be working with.
Secure a comfortable retirement with 3 easy steps
Book your free sessionJust because you add an extra dwelling to the property, doesn’t mean you ignore the original dwelling that was there. You don’t get to skip Cashflow Hacking step number 1 – adding a bedroom.
It is still imperative to add an extra bedroom to the main property, as a part of any conversion. This improves both the value and the rental potential.
For example, when sussing out a top-down conversion, you need to see where you can add the extra bedroom in the main upstairs home. That’s important even before you look at how renovating the downstairs basement into an ancillary dwelling.
This is where the oversized lounge comes in, which we talked about earlier.
Here, the strategy is to carve off some of the space from the large living space and turn it into the living area. Effectively you “infill” the bedroom into the superfluous living area. It’s a common hack, and it works well.
Adding an extra bedroom up-top supercharges the rent, and the second home boosts the yield of the purchase.
This double-whammy boost is why this sort of multi-reno conversion is attractive to the premium areas of Hamilton, Auckland and Wellington. That’s because in these areas most property’s have poor cashflow if rented out directly after purchase as a single dwelling.
By purchasing one expensive house in a premium location, and then renovating it into two properties, you can increase your cashflow to offset the initial high purchase price.
Human beings aren’t moles. Natural light is a big deal when it comes to homes and houses.
If you’re converting your downstairs garage or basement into an ancillary dwelling, the windows need to make up at least 10% of the floor size of each intended bedroom (as a rule of thumb).
You may need to add new windows into the new dwelling, or work with those that are already there.
Windows are also a top consideration when adding the bedroom to the original dwelling. That’s because bedroom windows tend to be higher up the wall than those in living areas.
Windows are something you absolutely need to consider from the get-go. Because when you are trading a dining room/living area for a new bedroom, you might have to start shuffling the windows around. This may not be possible if the outside cladding of the building is too hard to work with – for instance if the house is made of bricks.
Ask any BRRRR investor – thinking about windows probably keeps them up at night.
Under the healthy homes regulations, all living spaces can’t go above set moisture standards.
In reality, if you’re converting a downstairs basement, this can become susceptible to ground moisture seeping in because it’s closer to the ground, or part-way in the ground.
If you’re lucky, the property will have already have a moisture barrier (called a polythene groundsheet) built between the cinderblocks of the original building.
In layman’s terms, this means there is sheet between the ground and your house, which keeps everything dry.
But if the existing poly-barrier isn’t sufficient, or if it straight up doesn’t exist, there are retro-fit options.
This works the same way as tiling a shower. A professional will apply a blue-gooey substance around the inside of the property to keep the water from getting in.
Essentially, it’s a waterproofing from the inside out (as opposed to the poly-barrier working from the outside in).
It’s a back-to-front option, but it works.
In an ideal world, you want to avoid any situation where you need your neighbour’s consent.
For example, let’s say you want to convert a standalone garage on the property into a granny flat.
If it’s within 1.5 meters of a neighbour’s boundary, you must ask their permission to change your garage into another dwelling.
If you’re scoping a new property to purchase, it’s impossible to sort this out before you commit to the purchase. That’s because they need to see the final plans.
This doesn’t mean needing neighbour’s consent is an automatic dealbreaker. But it does mean you’ll need a plan b, if the neighbours say no. This could be an alternative renovation to still get the performance you want from the property.
This way you avoid hinging all of your hopes on a neighbour that may or may not allow you to do the reno of your dreams.
This is why the top-down, basement conversion is most common. You don’t need to involve your neighbours.
Many first-time renovators initially think they’ll add an extra dwelling into a standalone garage.
This is often nowhere near as simple as it seems.
Firstly, they usually don’t have any plumbing already installed. This means paying to have the pipes from the main home extended to the garage. This comes at a high cost. And usually, this cost doesn’t make financial sense.
Secondly, there is a lot more uncertainty with converting a standalone garage. That’s because if your property is older, the building code has changed substantially since the garage was built.
It can be a significant undertaking to bring that garage up to today’s building code.
Again, this doesn’t mean it’s impossible to do. I recently worked with an investor who configured a standalone garage into an ancillary dwelling on a Hamilton property.
However in this instance the garage was already a functioning workshop – two rooms and a garage. Plus there was already consent granted to install a bathroom.
So most of the heavy lifting had already been done.
In the end, the investor transformed the garage into a 2-bed ancillary dwelling.
This is a great example of what can be done. But it’s an exception to the general rule.
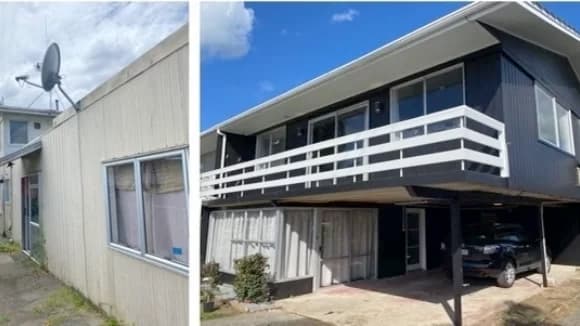
Here’s an example of a 3-bed, 1 bath home in Dinsdale, Hamilton, which was cashflow hacked into 4-bed, 2 bath, top-down home and income.
The purchase price was $785,000, which increased to $1.1 million.
The original rent doubled from $525 to $1155 a week. The main house earning $675 a week, an the downstairs earning $480.
Purchase price: 785K for a 3 bedroom 1 bathroom
The annoying answer is: It depends … on a whole heap of factors.
On top of the factors we have included in this article, investors also need to consider the property within the wider context of the location, and what the investor can realistically achieve.
You need to think about the location, the tenants, whether you’ve got the money for it and whether the property you’re eyeing up can be converted.
Here at Opes Accelerate, the investors we work with tend to start by converting a single property into a multi-tenancy. Then, as they gain more experience, they transition across to room-by-room rentals.
Both options can increase the rent substantially. Therefore considering your rental option is number 2 on the Cashflow Hacking list.
Resident Economist, with a GradDipEcon and over five years at Opes Partners, is a trusted contributor to NZ Property Investor, Informed Investor, Stuff, Business Desk, and OneRoof.
Ed, our Resident Economist, is equipped with a GradDipEcon, a GradCertStratMgmt, BMus, and over five years of experience as Opes Partners' economist. His expertise in economics has led him to contribute articles to reputable publications like NZ Property Investor, Informed Investor, OneRoof, Stuff, and Business Desk. You might have also seen him share his insights on television programs such as The Project and Breakfast.
This article is for your general information. It’s not financial advice. See here for details about our Financial Advice Provider Disclosure. So Opes isn’t telling you what to do with your own money.
We’ve made every effort to make sure the information is accurate. But we occasionally get the odd fact wrong. Make sure you do your own research or talk to a financial adviser before making any investment decisions.
You might like to use us or another financial adviser